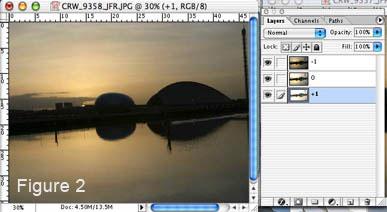
Open the lightest image (i.e., +1) and create a new layer ![]() . Open the second image (0), select the selection (Cmd-A), copy (Cmd-C) it in the new layer you have just created (image +1). Repeat this step for the other picture (-1). You can now close the other windows (0, -1) to save some memory. Your window should look like figure 2.
. Open the second image (0), select the selection (Cmd-A), copy (Cmd-C) it in the new layer you have just created (image +1). Repeat this step for the other picture (-1). You can now close the other windows (0, -1) to save some memory. Your window should look like figure 2.
Click on the first image (+1) and create a new layer. Paste the first image (+1) in the new created layer and then add a mask by pressing the quick mask![]() button on the bottom of the layers palette. To fill the new mask with you image, option-click the mask and copy (Cmd-V) the image into it. You now have a black and white image version of your first image and the result should look like figure 3. If you click on the background layer (+1), this will turn the image back into color with some extra details in the lightest parts. If you want, you can tune your image by changing the curves using Cmd-M or pressing the adjustement layer button in the layer palette (
button on the bottom of the layers palette. To fill the new mask with you image, option-click the mask and copy (Cmd-V) the image into it. You now have a black and white image version of your first image and the result should look like figure 3. If you click on the background layer (+1), this will turn the image back into color with some extra details in the lightest parts. If you want, you can tune your image by changing the curves using Cmd-M or pressing the adjustement layer button in the layer palette (![]() ) and selecting curves. To reduce the correction, I usually merge the adjustment layer with the layer containing the mask image. This is done by clicking the separation bar between the two layers (an icon with two interlaced circles will appear) whil holding down the option button. The result can be seen on figure 4
) and selecting curves. To reduce the correction, I usually merge the adjustment layer with the layer containing the mask image. This is done by clicking the separation bar between the two layers (an icon with two interlaced circles will appear) whil holding down the option button. The result can be seen on figure 4
